Z7_3054ICK0KGTE30AQO5O3KA30N0
hp-concentra-wrapper-portlet
 Actions
HP Notebook PCs - Upgrading Memory (RAM)
This document is for HP and Compaq notebook computers.
Upgrade the random-access retentivity (RAM) in an HP notebook computer to help improve system performance. To plan for the upgrade, determine what type of memory the computer has, the maximum amount of memory the computer can utilize, and the corporeality of retentivity your operating arrangement can support.
Notice the HP notebook product number
Earlier ordering new retention, obtain the notebook product number to look up documents and specifications for your specific model. This number is typically establish on a characterization on the bottom of the notebook or on the box it shipped in. Become to How Do I Find My Model Number or Production Number? for additional options.
note: The general family name near the keyboard or on the frame around the display screen does non provide sufficient data for ordering replacement parts.

Find currently installed memory specifications (amount, type, maximum supported)
Consult your notebook specifications or Maintenance and Service Guide for installed memory information. Go to the HP product support homepage for your computer model, and then select the Product Information category for the specifications document, or select User Guides for the Maintenance and Service Guide. Or in the Search field at the top of this page, type your production number, a space, and either specifications or maintenance and service guide (Case: RQ877AS specifications).
In the Maintenance and Service Guide, consult the Retentiveness section for retentiveness module specifications, memory module spare function numbers, compatible processors and types of RAM, and the number of memory slots.
In the notebook specifications document consult the Memory section for the following information.
-
Amount of memory installed: Check the current corporeality of memory installed on your computer, and so get to the Verify how much memory you can add together section in this document.
-
Maximum memory supported: Subtract the amount of retention already installed from the maximum corporeality supported past the system to decide how much memory to buy. You can also purchase the maximum amount allowed and replace the currently installed memory. Then go to the Confirm the maximum memory supported by your Windows version department in this document. Utilize the lower of these ii numbers every bit your maximum retention.
-
Type of retentivity (including speed): HP recommends purchasing the same type of memory (aforementioned size, speed, and manufacturer) for each slot. For the best performance, purchase the fastest memory the motherboard supports.
caution: Some motherboards are non able to configure memory modules with different manufacturers, or different CAS or density values. To ensure your retention is compatible, make sure all And so-DIMMs have the same part number.
Determine where notebook retentivity is located
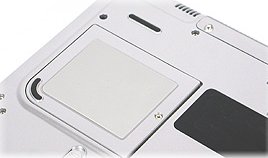
The memory module compartment is located on the bottom of most HP and Compaq notebook computers. For some notebook models where the compartment is under the keyboard, HP recommends contacting an HP authorized support provider for assistance ordering and replacing the memory.
Read the Removal and replacement section in the Maintenance and Service Guide for your estimator for detailed instructions on finding the memory compartment. The Maintenance and Service Guide is available in the Product Information category on the HP product support homepage for your estimator model. Or in the Search field at the top of this page, type your product number, a infinite, and maintenance and service guide (Example: RQ877AS maintenance and service guide).
Verify how much retentiveness you tin can add together
Confirm the amount of installed memory to determine how much memory can exist added, depending on whether the computer is turned on or off.
Verify memory amount while the calculator is turned on
Check memory amounts while your computer is turned on using HP Support Assistant.
-
In Windows, search for and open up HP Support Assistant.
-
On the My devices tab, click My notebook.

-
On the Specifications tab, note the Organisation retention that is currently installed.

-
To detect the full amount of memory that tin be added, subtract the amount of memory currently in the computer from the maximum amount of retentiveness the estimator can agree. To see the maximum memory the figurer can hold, become to the Find currently installed memory specifications department in this document.
-
To observe the amount of memory per slot, split up the maximum corporeality of memory that the computer can hold by the number of memory slots on the motherboard. Usually, this is the maximum amount for each memory socket. For example, if the calculator can hold a maximum of 4096 MB (4 GB) of memory and the motherboard has four retentiveness slots, install ane GB (or less) per slot.
Verify retentivity amount while the computer is turned off
Open the retention module compartment to bank check retentivity amounts when the calculator is non powered on.
-
Shut the computer down and disconnect the power cord.
-
Turn the notebook over and place it on a firm surface.
-
Remove the battery.
-
Locate the memory module compartment cover, and and so apply a Phillips screwdriver to open it.
-
Before touching the retentivity, ground yourself to belch whatsoever static electricity. Place one hand on the case of the computer and touch the other mitt to a metallic surface or grounded object, such as the metal role of a lamp.
-
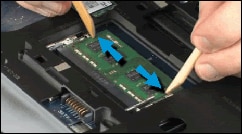
Await at the retentiveness to decide the number of available memory module slots, and the number of slots that are already in utilize.

-
Release the side catches and grasp the outside edges of the retentivity to remove each module from the slot.
caution: Do non touch the gold connectors that go into the holder. Touching the connectors can impairment the existing retentivity.
-
Await on the retention module for stickers that have memory amount, replacement part numbers, and product information.

-
To observe the full amount of memory that can be added, subtract the corporeality of retention currently in the figurer from the maximum corporeality of retention the estimator tin can hold. To see the maximum retention the estimator can hold, go to the Find currently installed memory specifications section in this certificate.
-
To discover the amount of memory per slot, divide the maximum amount of retentivity that the computer can hold by the number of memory slots on the motherboard. Usually, this is the maximum amount for each retentivity socket. For example, if the computer can hold a maximum of 4096 MB (4 GB) of retentiveness and the motherboard has iv memory slots, install 1 GB (or less) per slot.
Confirm the maximum memory supported by your Windows version
Determine the amount of memory supported past the Windows version installed on your HP notebook computer.
-
Maximum retention for Windows 10 versions
Windows ten has a minimum retentiveness requirement of i GB RAM (32-bit) or two GB RAM (64-bit).
| Windows 10 version | Maximum memory - 32 -bit (X86) | Maximum memory - 64-chip (X64) |
| Windows 10 Home | 4 GB | 128 GB |
| Windows ten Education | 4 GB | two TB |
| Windows ten Enterprise | 4 GB | 2 TB |
| Windows eight Pro | iv GB | 2 TB |
-
Maximum memory for Windows 8 versions
Windows 8 has a minimum retention requirement of 1 GB RAM (32-bit) or two GB RAM (64-bit).
| Windows 8 version | Maximum retentivity - 32 -scrap (X86) | Maximum memory - 64-bit (X64) |
| Windows 8 | 4 GB | 128 GB |
| Windows 8 Enterprise | 4 GB | 512 GB |
| Windows 8 Professional | 4 GB | 512 GB |
-
Maximum memory for Windows 7 versions
Windows seven has a minimum retentiveness requirement of 1 GB RAM (32-bit) or ii GB RAM (64-bit). The maximum amount of retention depends on the edition used:
| Windows seven version | Maximum addressable retentivity |
| Starter (32-scrap or 64-scrap) | 2 GB |
| Any 32-bit version of vii (except Starter) | 4 GB (approximately 3.3 GB available for use) |
| Habitation Basic 64-bit | eight GB |
| Home Premium 64-bit | 16 GB |
| Enterprise 64-bit | 192 GB |
| Business 64-scrap | 192 GB |
| Ultimate 64-bit | 192 GB |
Install new memory
For most HP and Compaq notebooks, new retentiveness is installed through the retentivity module compartment on the bottom of the computer. Review the following steps to ostend they piece of work for your computer. For steps for your specific model, bank check your User Guide or enter your computer model number and replace memory in the search field at the top of this page (Instance: RQ877AS replace retentivity).
note: If y'all are not confident performing the installation yourself, contact an HP authorized service for aid. If a person or service other than an authorized HP service upgrades the retentiveness, any damage is excluded from coverage nether the product warranty. The customer assumes all gamble and liability for memory upgrade-related amercement.
-
Close the computer down and disconnect the power cord.
-
Turn the notebook over and place it on a business firm surface.
-
Remove the battery.
-
Locate the memory module compartment cover, and then use a Phillips screwdriver to open it.
-
Earlier touching the memory, ground yourself to discharge whatever static electricity. Place one mitt on the instance of the calculator and bear upon the other mitt to a metal surface or grounded object, such every bit the metallic part of a lamp.
-
If you need to remove existing memory before installing new memory, spread the clips holding the module outward to release information technology, and then grasp the module by the side edges to remove it.
circumspection: To prevent memory module harm, do non bear on the metal contacts.
-
Place any removed modules in an anti-static handbag for protection.
-
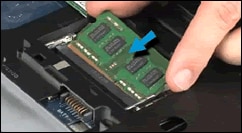
Holding the new memory past the side edges, gently insert the memory module at an angle into the slot.
-
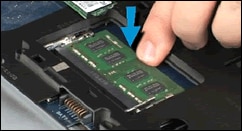
Gently but firmly press down on the module to seat information technology into place. The clips click when the retention is properly installed.
-
Reinstall the retention module compartment cover.
-
Reconnect the ability cord.
-
Reinstall the notebook battery.
-
Turn on the notebook to consummate the memory upgrade configuration.
Resolve problems later installing new memory
Afterward adding the memory, if the estimator does non start or Windows does not open, y'all hear beeps, or there are blinking lights near the Caps Lock or Num Lock keys, try the following steps:
-
Remove and reseat the new retentiveness module.
-
Remove the new memory module and clean the groove in the socket that the module sits in. While wearing rubber spectacles, employ a can of compressed air with a straw-type extender to make clean out whatsoever dust or droppings.
-
Remove the new memory module and try starting the reckoner again. If the computer starts, brand sure you purchased the right type and uniform size of retention. For more data on purchasing the right type of memory, refer to the Detect currently installed memory specifications and Verify how much retentivity tin can exist added sections in this document. Use the original retentivity module for reference.
-
If possible, brand certain all memory modules in your configuration are from the same manufacturer and have the same role number.
-
If the computer still does not restart, remove the replacement retentiveness, reinstall the original memory, so verify that the computer tin operate in its original configuration.
Review retentiveness module types and requirements for HP computers
Learn about memory modules and their requirements when used with HP computers.
Then-DIMM retentiveness and requirements
Small outline dual in-line retention modules (SO-DIMMs) are used in notebook computers. They are smaller and thinner than other DIMMs, and then are used when there is less space within a chassis. So-DIMM modules for HP computers must meet the following requirements:
-
The number of pins on the So-DIMM must match the socket type.
-
Then-DIMM memory requires a 200-pin slot.
-
DDR2 SO-DIMMs are non compatible with DDR1 DIMM and DDR2 DIMM retentivity modules.
-
DDR3 SO-DIMMs are not uniform with DDR1 or DDR2 and use a 204 pin slot.
-
With a calculator running at a arrangement bus of 533 MHz or 667 MHz, use a PC2-4200 (DDR2 DIMM 533) type.
DIMM memory and requirements
Dual in-line memory modules (DIMMs), used in most desktop computers, are small circuit boards that can hold groups of memory chips. DIMMs provide a wider path with ii rows of pins on a side, allowing for faster data transfer than unmarried in-line memory modules (SIMMs). DIMMs might be manufactured single or double-sided. DIMMs do not have to be added in pairs and tin be mixed with other DIMMs that have the same number of pins. For example, a ane GB DIMM can be added to the motherboard adjacent to a ii GB DIMM.
annotation: DIMMs can only operate as fast every bit the speed of the arrangement bus. If two or more DIMMs of different speeds are installed, the total speed of all installed retentiveness is as fast as the DIMM with the lowest speed.
DIMM modules for HP computers must run into the following requirements:
-
The number of pins on the DIMM must match the socket type.
-
DDR memory requires a 184-pivot slot and two.5 operating voltage.
-
DDR2 memory is not compatible with DDR1 memory and requires a 240-pin slot and 1.eight operating voltage.
-
DDR3 memory tin can operate about twice the bandwidth of DDR2.
DDR3 DIMMS are not compatible with DDR1 or DDR2 memory.
DDR3 DIMMS require a 240-pivot slot and 1.5 operating voltage. A slot for DDR3 memory is keyed differently than DDR2 or DAR. Do not attempt to install DDR3 retention into a motherboard designed for DAR or DDR2. Doing so tin permanently damage the motherboard and DIMM.
-
Synchronous dynamic random access retention (SCRAM): Merely utilize DAR blazon SCRAM retentiveness if the reckoner came with DDR-SDRAM.
RIMM memory and requirements
Rambus in-line retention modules (RIMMs) are 184-pin memory boards that allow transfer rates of 600-800 MHz. RIMMs used with the Intel Pentium® four processors run on a 400 MHz system bus, allowing data transfer rates of 3.2 GB a second. RIMM modules for HP computers must meet the following requirements:
-
HP computers require PC600 or PC800 RDR modules (184-pin Rambus dynamic Random access retention [RDRAM]).
-
Not-ECC (non fault-correcting checking).
-
Rambus/Intel specification compliant.
-
All four RIMM sockets must be filled, either with a RIMM or with a continuity module chosen a Continuity RIMM (C-RIMM). C-RIMMs do not incorporate retentiveness, but are placeholders to close the memory circuit.
-
RIMMs work in pairs, and they must be from the same vendor. RIMMs must also have the same retention size density within each aqueduct.
-
When C-RIMMs fill up empty sockets, they must exist placed in the RIMM A2 and B2 sockets.
-
The RIMMs must exist inserted in the RIMM A1 and B1 sockets.
And so-RIMM memory and requirements
Small-scale outline Rambus in-line memory modules (Then-RIMMs) are 160-pin retentiveness boards used in notebook computers. They are smaller than other RIMMs, and then are used when there is less space within a chassis.
Retentiveness with dual channel or triple channel fashion
Certain memory modules tin can operate in multiple channel modes. The motherboard specifications for your computer contain dual channel mode data, if available and supported. Dual channel and triple aqueduct memory style provides increased performance over unmarried channel mode.
notation: Motherboards with Intel i945G or i945P chipsets; with DDR2-667 memory modules using one Gigabit technology perform as DDR2-533 retentivity modules. If faster DDR2-667 memory modules are used, they must be 256 or 512 Megabit.
The following requirements must be met for the DDR retentivity to function in multiple aqueduct mode:
-
All DIMMS must be of the same density (256 MB, 512 MB, etc.)
-
Aforementioned DRAM bit technology (x8 or x16).
-
All either single-sided or dual-sided.
-
DDR2 and DDR3 support Dual Aqueduct mode. The same type of retentivity must exist matched into the same matched slot for Aqueduct A and Channel B. Usually the memory slots are color coded to go far easier to understand.
-
DDR3 memory tin can back up 3 DIMMs in Triple Aqueduct mode. The same memory size and blazon needs to be installed into the matched DIMM slots for channels A, B and C. Commonly the retentivity slots are color coded to brand it easier to sympathize.
Purchase retentivity upgrades
HP recommends purchasing retention directly from HP, an authorized HP dealer, or from a reputable calculator parts supplier such every bit Crucial.
Many reckoner parts suppliers partner with HP to suggest the correct memory for your computer model. Earlier purchasing retention, make sure you know how much memory yous need and what type of retention is compatible with your computer.
Source: https://support.hp.com/us-en/document/c00820047
Posted by: martinthreare1936.blogspot.com


0 Response to "How To Increase Ram On Windows 8"
Post a Comment